Vue + JWT를 이용하여 로그인 구현하기(1)
https://www.youtube.com/channel/UCfm6gDYNrEW2hXCcIrVvj0w
아프리카도서관
africalibrary21@gmail.com
www.youtube.com
해당 영상을 보며 공부한 것을 정리한 내용입니다. 추천!!
1. 프로젝트 생성
1) Test 폴더를 하나 만들어줍니다.
2) 폴더 안으로 들어가서 개발환경을 셋팅합니다.
// frontend 폴더 생성
vue create frontend

//생성 후, fontend 실행
cd fontend
npm run serve
npm run serve를 했을때,
다음과 같은 화면이 뜬다면
지금까지 아주 잘하고 있는 것!!!
3) 최상위 폴더로 가서 backend 폴더 만들어주기
mkdir backend

//backend 환경 설정
cd backend
npm init
npm install express
backend폴더에 api-server 만들어주고, 코드 작성하기
const express = require('express')
const app = express()
const port = 3000

app.get('/', (req, res) => {
    res.send('Hello World!');
})

app.listen(port, () => {
    console.log(`Example app listening at http://localhost:${port}`)
});
2. 로그인 창만들기
app.vue에 다음과 같이 작성하기
<template>
<div class="app">
  <div v-if="state.loggedIn">안녕하세요? 아무개님!</div>
  <div v-else>
    <label for="loginId">
      <span>아이디</span>
      <input type="text" id="loginId" />
    </label>
    <label for="loginId">
      <span>Password</span>
      <input type="password" id="loginPw" />
    </label>
    <hr />
    <button>로그인</button>
  </div>
</div>
</template>

<script>
import { reactive } from 'vue';

export default {
  setup() {
    const state = reactive({
      loggedIn: false,
    });

    return { state };
  },
};
</script>

<style>
#app {
  font-family: Avenir, Helvetica, Arial, sans-serif;
  -webkit-font-smoothing: antialiased;
  -moz-osx-font-smoothing: grayscale;
  text-align: center;
  color: #2c3e50;
  margin-top: 60px;
}
</style>
다음과 같이 작성하고 실행하면, v-if = "state.loggedIn" 로 인해서
① loggedIn : false인 경우

② loggedIn : true인 경우

3. backend와의 http 통신을 위해서 axios 모듈 설치하기
1) 모듈 설치하기
npm i axios
2) backend . api-server 작성하기
app.get('/api/account', (req, res) => {
    res.send({
        mid: 3,
        memberName: "아무개"
    });
})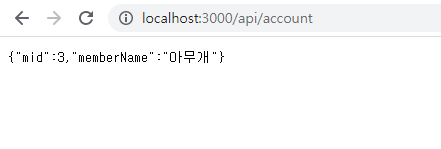
다음의 창이 뜬다면, 아주 잘따라한 것!!
3) fontend/vue.config.js 작성하기
module.exports = {
  devServer: {
    proxy: {
      "/api": {
        target: "http://localhost:3000"
      }
    }
  }
}
4. backend에 넣어준 db를 front에서 받을 수 있도록 app.vue에 다음과 같이 코드 수정 및 추가하기
<template>
<div class="app">
  <div v-if="state.account.mid">안녕하세요? {{state.account.memberName}}님!</div>
  <div v-else>
    <label for="loginId">
      <span>아이디</span>
      <input type="text" id="loginId" />
    </label>
    <label for="loginId">
      <span>Password</span>
      <input type="password" id="loginPw" />
    </label>
    <hr />
    <button>로그인</button>
  </div>
</div>
</template>

<script>
import { reactive } from 'vue';
import axios from "axios";

export default {
  setup() {
    const state = reactive({
      account:{
        mid:null,
        memberName: "",
      },
    });

    axios.get("/api/account").then((res) => {
      state.account = res.data;
    });

    return { state };
  },
};
</script>
backend.api-server에 저장되어 있는 사용자 정보를 불러와야합니다.
불러오는 방법은 state 상태 값에 account라는 객체를 추가해줍니다.
그리고 각각의 아이디 값인 mid와 사용자 이름인 memberName은 모두 빈칸으로 값을 부여.